

We routinely receive inquiries from the community on freezing different objects into Klaris cubes. This is a complex topic addressed in 3 blog posts.
- Part #1 How do the professionals do it?
- Part #2 What have people tried at home?
- Part #3 How can the Klaris clear ice maker be used?
In this post the focus is using the Klaris clear ice maker to embed objects in ice. The Klaris machine uses a bottom-up directional freezing process with active agitation. This is a similar process with similar challenges to the approach explained in Part #1. Objects that are of similar or lower density than water can float and not be embedded in the ice. With the Klaris machine, floating objects can interfere with the mixer (active agitation), resulting in cloudy ice and potentially damaging the machine. It is important to properly secure the object within the freezing cavity of the tray.
Using the Klaris machine, 3 different methods are recommended to embed objects:
1. Use objects that are denser than water
We have had success placing metal objects like a coin or metal chess piece at the bottom of the tray. The denser metal stays at the bottom of the tray during the ice production cycle. Typically, a small object will not be centered vertically in the cube. This eliminates the appearance of complete suspension within the cube as shown in the photograph below.

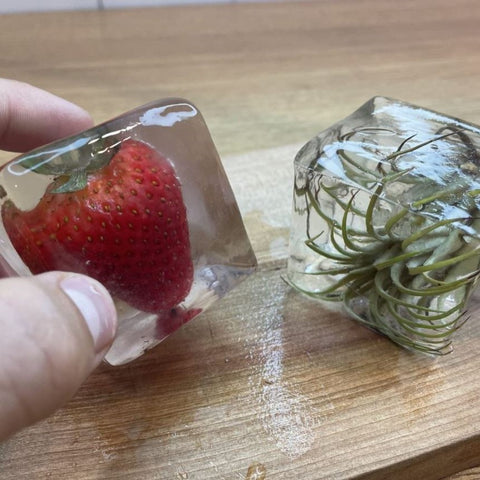
2. Use objects with a dimension spanning 2-3"
The Klaris community has had success with limes, orange peels and flowers by wedging these items between the vertical walls. If the object is 2-3" in length, it will contact the walls or corners of the tray cavity. To demonstrate this approach an air plant was used and the results were excellent as shown in the photograph. Note that water flow between the object and cold plate is needed otherwise cloudy ice may form.


3. Use metal wire to secure object in place - Vertical
Metal wire with a similar thickness to a paper clip can be placed in the bottom of the insert using a modified card holder. Cut off the top portion of the card holder and pierce the object to be suspended. Secure the bottom of the card holder to the top of the insert (we used tape). This method does not look pretty, but the result is clear!


Place the insert into the tray, fill with water, ensure object is secured then start the ice production cycle. At the completion of the freezing cycle , remove the inserts and cubes. Carefully separate the insert from the cubes. Based on the difference in thermal conductivity between the ice and metal, the wire can be removed easily.

4. Use metal wire to secure object in place - Horizontal
Another approach using wire is to pierce through the object and wedge the wire between the vertical walls of the cavity. Be careful not to pierce the tray as it will create leaks. Again, fill the tray with water, verify the objects are properly secured, then start the ice making cycle. At the end of the process, carefully remove the cubes from the tray and inserts, then using pliers, grab one end of the wire to pull it out. Thermal conductivity should make this easy.


Some things to avoid
- Do not start the freezing production cycle, stop halfway, then place your object in the machine. This will cause the open lid alarm and if the process is immediately restarted it will lead to ice overgrowth.
- Large or tall metal objects can significantly impact the freeze time and ice shape, potentially leading to ice overgrowth.
At Klaris, we are continuing to explore more robust, commercial solutions to simplify the process as we recognize the community is interested in this creative outlet. We would love to hear what you have found to work!