
Large, clear craft ice has become a staple and common ingredient in cocktails like an old fashioned or a favorite spirit on the rocks. Craft ice not only looks beautiful but melts slower. Cube size, density, and pure composition maintain the true taste of the beverage. Large, clear ice cubes are created through the directional freezing process. Using this process only one side of the water and ice formed is cooled, moving impurities and dissolved gases away from the cooling surface and ultimately out of the ice.
There are two widely used methods for directional freezing, top-down or bottom up. Top-down freezing is analogous to how northern lakes freeze. The bottom-up approach was standardized by a machine called the Clinebell. This machine most likely made the large, crystal clear ice served with an elegant craft cocktail at most upscale restaurants and bars.
Cooler Clear Ice Method
For a comparison of ice making techniques an experiment and review of the “Cooler Method” for making ice was conducted. The cooler method is the original method of producing clear ice at home. This method uses the top-down directional freezing approach to create large, clear ice that can be carved into cubes and other shapes.
Items needed:
- Cooler insulated on 5 sides (no top)
- Water
- Freezer space
- Towel
- Table or working space
- Serrated knife or saw
- Insulated gloves
1. Cooler Set Up
- A foam cooler and a lunch cooler were used for this experiment. The tops of each were removed.
- Each cooler was filled ~2 inches from the top with tap water. Space between the top of the containers and the water level helps reduce spillage when transferring contents to the freezer. It also accounts for volume changes as water expands ~9% when it goes from a liquid to a solid.
- Each cooler was placed in a dedicated, level space within a front-loading freezer.


2. Freezing
- Each cooler was checked after ~24 hours. The foam cooler unfortunately was not water tight, allowing water to leak throughout the freezer. Luckily, the secondary cooler was watertight and ice formation was progressing.
- By removing the cooler and tilting it left and right, some bubbles in the water beneath the ice were observed. Approximately 1” of ice had been created. Another 1” of ice thickness was desired so freezing continued for another 24 hours.
- Note: Freeze time is dependent on several factors including the freezer performance, cooler position in the freezer, cooler insulation, cooler dimensions, and water level. Typically, 24-48 hours (about 2 days) is recommended for ice to freeze using this method. If the same equipment and approach is taken batch to batch, the processing times should be consistent.
- After 48 hours (about 2 days) the lunch cooler was removed from the freezer and placed upside down in a sink to thaw. The cooler can also be placed upside down on a towel but beware, residual water may remain within or underneath the ice.
- As the cooler and ice acclimate to room temperature, a small film of water will develop between the ice and the cooler, and it will slowly begin to separate. This process may take a couple of hours.
- Hot Tip (Pun Intended): To speed up, you can run hot water over the outside of the cooler.


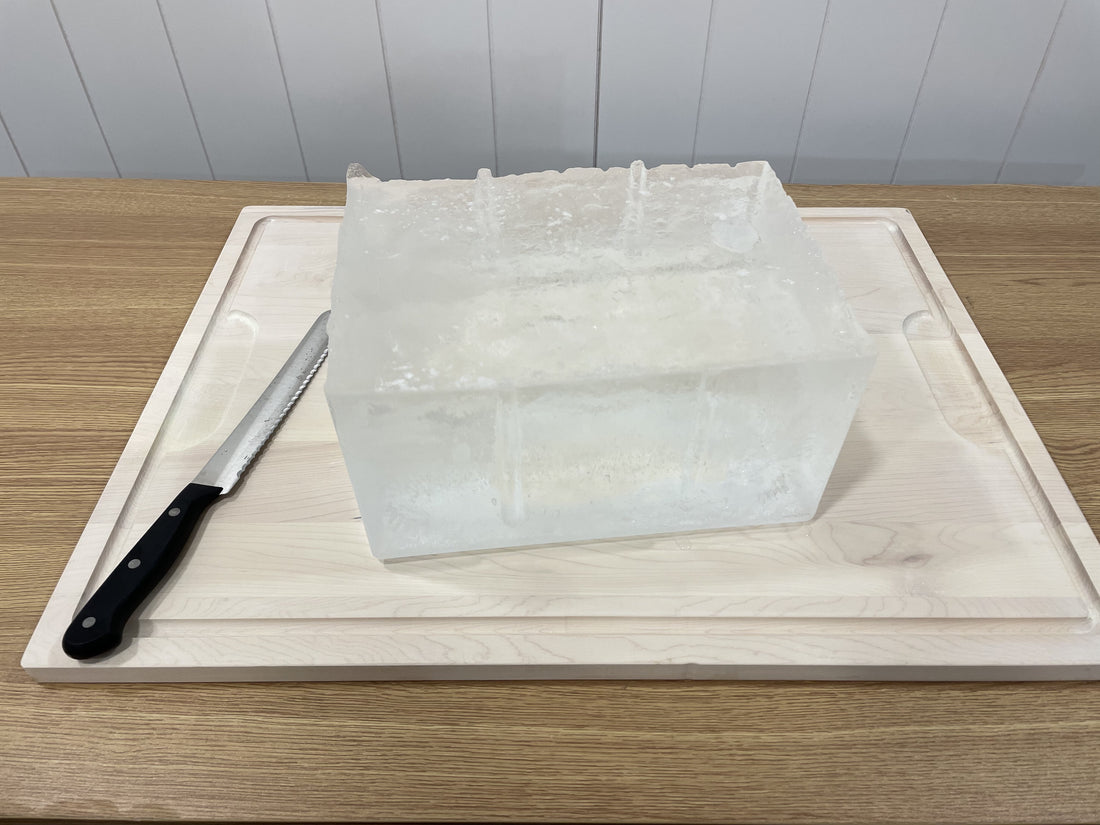
3. Harvesting & Cleaning Main Ice Block
- With the ice block now removed from the cooler, the clear and cloudy sides of the ice should be separated. Wearing insulated gloves is recommended when handling the ice block to keep hands warm, provide safety from cutting tools, and reduce melting of the block.
- Using a serrated knife or saw, begin to score the ice along the line you would like to cut. Once scored, begin to lightly saw back and forth. From time to time, tap the top of the knife. This will encourage the ice to split along the score line like cutting glass. After a few tries, the ice should split neatly along the score line. Use the serrated knife or saw to remove any additional, undesired portions.


4. Cutting Clear Ice Block into Desired Shapes & Sizes
-
The clear block of ice is now ready to be cut into the desired shape and sizes. Start by scoring an outline of the cut desired around the block. Once scored, begin to lightly saw back and forth. From time to time, tap the top of the knife. After a few tries, the ice should split neatly along the score line.
-
For this ice block, it was not as thick as desired. A couple of 2" cubes were made but most of the ice made taller Collins type cubes (~1"x1"x5").


Results:
Cooler Method Pros:
- Budget friendly - Most people have the needed supplies at home
- Different shapes & sizes - since the ice is carved from a larger block, there is flexibility for cube shape creation
- Acceptable clarity - some inclusions were observed in the ice but it was generally very clear
Cooler Method Cons:
- Slow process - It took 48 hours to create ~1.5" of acceptable clear ice to use.
- Messy - ice and water can get everywhere during extraction from cooler and cutting down of the block.
- Hands on - cutting and carving the ice can be tedious, time consuming and dangerous.
- Freezer space - A dedicated freezer was needed. This method would not work in most kitchen freezers.
Klaris - The Clear Craft Ice Maker
To learn about clear, craft ice making at home the cooler method was the first thing we tried. It was fun to do once, but not on a weekly basis. This was one of the reasons we started Klaris. To make it simple, easy, fast, and fun to create large, crystal-clear craft ice at home. Check us out!
